When the summer heat hits or you’re craving something sweet yet nutritious, these Frozen Greek Yogurt Peanut Butter Bites are your answer to dessert dreams come true. Imagine creamy, protein-packed Greek yogurt meeting rich, nutty peanut butter in perfect frozen harmony – all while keeping your health goals intact. These bite-sized treasures prove that healthy desserts can be just as satisfying as their sugar-laden counterparts.
Why You’ll Love This Recipe
These delightful frozen treats are more than just a dessert – they’re a game-changer for anyone seeking balance between indulgence and nutrition. Here’s what makes them absolutely irresistible:
Protein powerhouse: With Greek yogurt as the star ingredient, each bite delivers a substantial protein boost that keeps you satisfied longer than traditional frozen treats. This makes them perfect for post-workout snacks or afternoon energy boosters.
Simple preparation: Unlike complicated dessert recipes that require special equipment or techniques, these bites come together in minutes with ingredients you likely already have in your kitchen. No ice cream maker, no tempering chocolate, no stress.
Customizable sweetness: The beauty of using sugar-free sweetener means you control exactly how sweet your treats become. Whether you prefer subtle sweetness or something more indulgent, you’re in complete control.
Freezer-friendly convenience: Make a batch on Sunday, and you’ll have ready-to-eat treats waiting whenever cravings strike. They’re perfect for meal prep enthusiasts who like planning ahead.
Kid-approved: These bites are so naturally delicious that children won’t even realize they’re eating something healthy. It’s a win-win for parents seeking nutritious snack options that don’t trigger battles at snack time.
Budget-friendly: With just five simple ingredients, this recipe won’t break the bank while delivering gourmet-quality results that rival expensive frozen dessert bars.
Ingredients
The magic happens with these carefully selected ingredients that work together to create the perfect texture and flavor balance:
1/2 cup Greek yogurt: Choose thick, creamy Greek yogurt for the best results. The higher protein content and tangy flavor create the perfect base. Plain, unsweetened varieties work best as they don’t compete with other flavors.
1/4 cup natural peanut butter: Opt for natural peanut butter without added oils or sugars. The natural oils help create a smooth, creamy texture while providing healthy fats. Almond butter or sunflower seed butter work as excellent substitutes for those with peanut allergies.
1-2 tablespoons sugar-free sweetener: Stevia, erythritol, or monk fruit sweetener all work beautifully in this recipe. Start with one tablespoon and adjust to taste, remembering that frozen treats taste less sweet than room-temperature mixtures.
1/2 teaspoon vanilla extract: Pure vanilla extract adds depth and warmth to the flavor profile. This small amount makes a significant difference in the overall taste experience.
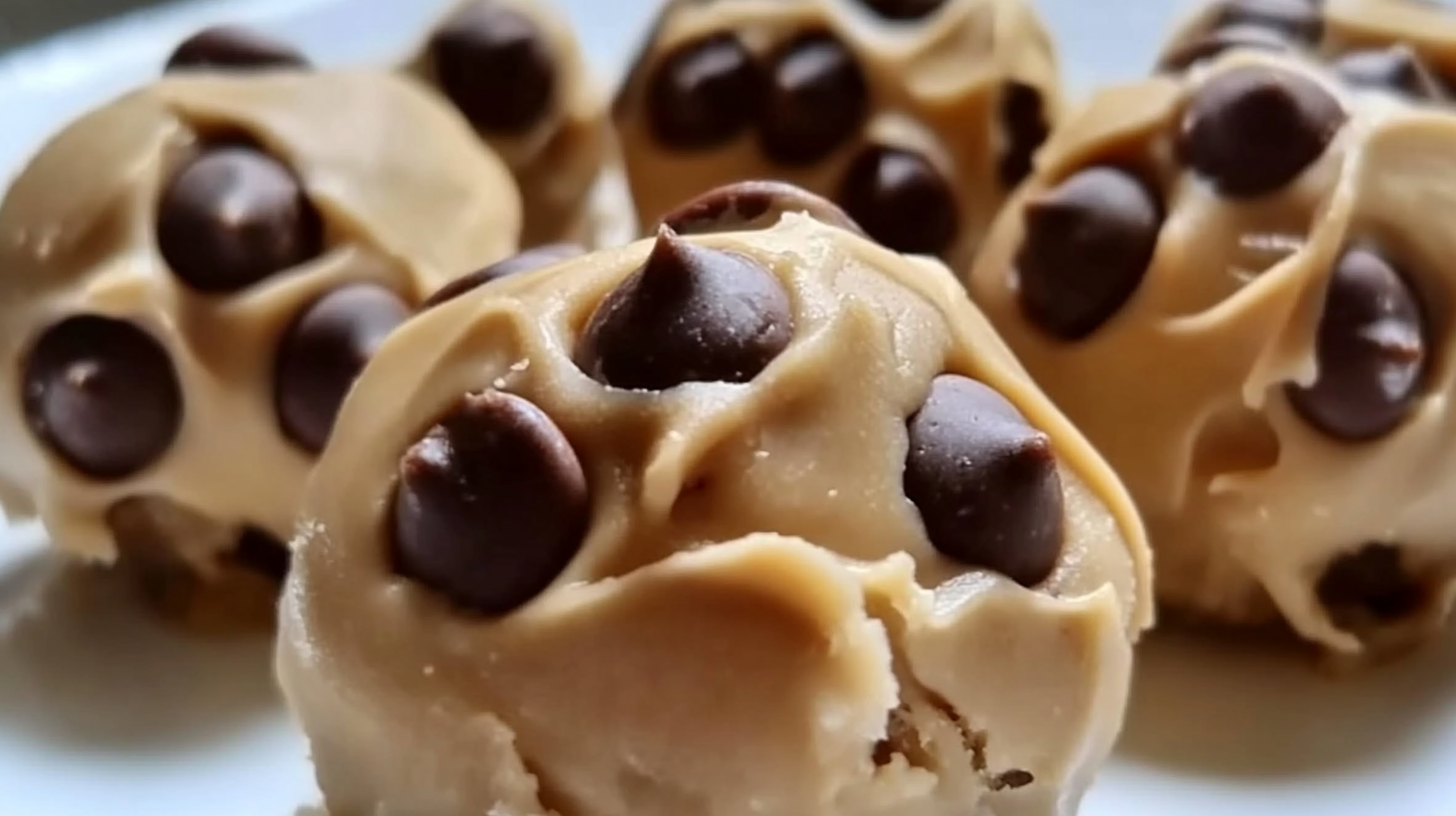
2 tablespoons mini chocolate chips (optional): These tiny bursts of chocolate create delightful texture contrast and visual appeal. Sugar-free chocolate chips maintain the healthy profile while dark chocolate varieties add antioxidants.
Directions
Creating these frozen delights is surprisingly straightforward, but attention to detail ensures perfect results every time:
Step 1: Prepare your workspace: Before beginning, ensure your silicone molds are clean and dry, or prepare a parchment-lined baking tray. Having everything ready prevents the mixture from sitting too long before freezing.
Step 2: Combine the base ingredients: In a medium mixing bowl, add the Greek yogurt, natural peanut butter, sugar-free sweetener, and vanilla extract. The key to success lies in achieving a completely smooth mixture without any lumps of peanut butter.
Step 3: Mix thoroughly: Using a whisk or electric mixer on low speed, blend all ingredients until the mixture reaches a uniform, creamy consistency. This typically takes 2-3 minutes of steady mixing. The mixture should be smooth enough to spoon easily but thick enough to hold its shape.
Step 4: Portion the mixture: Using a small spoon or cookie scoop, distribute the mixture evenly into your chosen molds or create small dollops on the parchment-lined tray. Uniform sizing ensures even freezing and professional-looking results.
Step 5: Add chocolate chips: If using mini chocolate chips, gently press 3-4 chips into the top of each portion. This prevents them from sinking to the bottom while adding visual appeal.
Step 6: Freeze completely: Place the molds or tray in the freezer for 1-2 hours, or until the bites are completely firm. Avoid opening the freezer door frequently during this time, as temperature fluctuations can affect the final texture.
Serving and Storage Tips
Proper serving and storage techniques maximize both flavor and convenience:
Serving suggestions: Remove the bites from the freezer 2-3 minutes before serving to achieve the perfect creamy-yet-firm texture. Serve them in small bowls or arrange on a decorative plate for special occasions.
Storage best practices: Transfer completely frozen bites to an airtight container or freezer-safe bag. Layer them between parchment paper to prevent sticking. Properly stored, they maintain optimal quality for up to three months in the freezer.
Portion control: These bites are intentionally small to encourage mindful eating. Two to three bites typically satisfy sweet cravings without overindulging, making them perfect for healthy lifestyle maintenance.
Serving occasions: Beyond everyday snacking, these treats shine at summer barbecues, children’s parties, or as elegant petit fours at dinner parties. Their sophisticated appearance belies their simple preparation.
Helpful Notes
These insider tips ensure your frozen treats turn out perfectly every time:
Texture optimization: If your mixture seems too thick, add a teaspoon of milk or additional yogurt. If it’s too thin, refrigerate for 15 minutes before portioning to help it firm up slightly.
Sweetener considerations: Different sugar-free sweeteners have varying levels of sweetness. Taste your mixture before freezing and adjust accordingly, remembering that frozen desserts taste less sweet than room-temperature versions.
Mold alternatives: Don’t have silicone molds? Ice cube trays, mini muffin tins, or even small paper cups work excellently. The key is choosing containers that make removal easy once frozen.
Flavor variations: Experiment with different extracts like almond or coconut, or add a tablespoon of cocoa powder for chocolate lovers. Cinnamon or nutmeg can create warming spice notes that complement the peanut butter beautifully.
Make-ahead convenience: Double or triple the recipe for larger households or frequent entertaining. Having a stash of these healthy frozen treats ready means you’re always prepared for unexpected guests or sudden cravings.
Frequently Asked Questions
Can I use regular yogurt instead of Greek yogurt? While possible, Greek yogurt’s thicker consistency and higher protein content create superior texture and nutritional value. Regular yogurt may result in icier, less creamy bites.
How long do these keep in the freezer? When stored properly in an airtight container, these bites maintain excellent quality for up to three months. However, they’re usually consumed much faster due to their irresistible taste!
Can I make these dairy-free? Absolutely! Substitute the Greek yogurt with coconut yogurt or another plant-based alternative. Choose varieties with similar thickness and tanginess for best results.
What if I don’t have sugar-free sweetener? Regular sugar, honey, or maple syrup work as substitutes, though they’ll increase the overall sugar content. Start with less than the recipe calls for, as these sweeteners are often more potent than their sugar-free counterparts.
Can children help make these? These treats are perfect for family cooking activities. Children can measure ingredients, mix the mixture, and help portion it into molds under supervision.
Final Thoughts
These Frozen Greek Yogurt Peanut Butter Bites represent everything wonderful about mindful indulgence – they satisfy your sweet tooth while nourishing your body with quality protein and healthy fats. The simplicity of preparation means you can whip up a batch whenever the mood strikes, while their freezer-friendly nature ensures you always have a healthy treat on hand.
Whether you’re meal prepping for the week, looking for a post-workout snack, or simply wanting to enjoy something sweet without the guilt, these little frozen gems deliver on all fronts. The combination of creamy Greek yogurt and rich peanut butter creates a flavor profile that’s both familiar and exciting, while the customizable sweetness level means everyone in your family can enjoy them.
So go ahead, give this recipe a try. Your taste buds – and your body – will thank you for choosing a treat that’s as nutritious as it is delicious. After all, the best recipes are those that make healthy eating feel like a celebration rather than a sacrifice.